Build Your Own Cheap & Easy DIY Dust Collector!

Build Your Own Cheap & Easy DIY Dust Collector!

You deserve a clean workshop and vacuum!
March 17, 2023
  • Post
  • Pin It
  • Subscribe

Getting dust in the hardest-to-clean areas is no fun. In a workshop, it can damage tools and make projects grimy and unsightly. Luckily, we have the best DIY solution for those of you looking to control where your dust goes, and where it doesn't!

A cheap and budget-friendly option for those looking to clean up the dust in their workshop and save some cash.

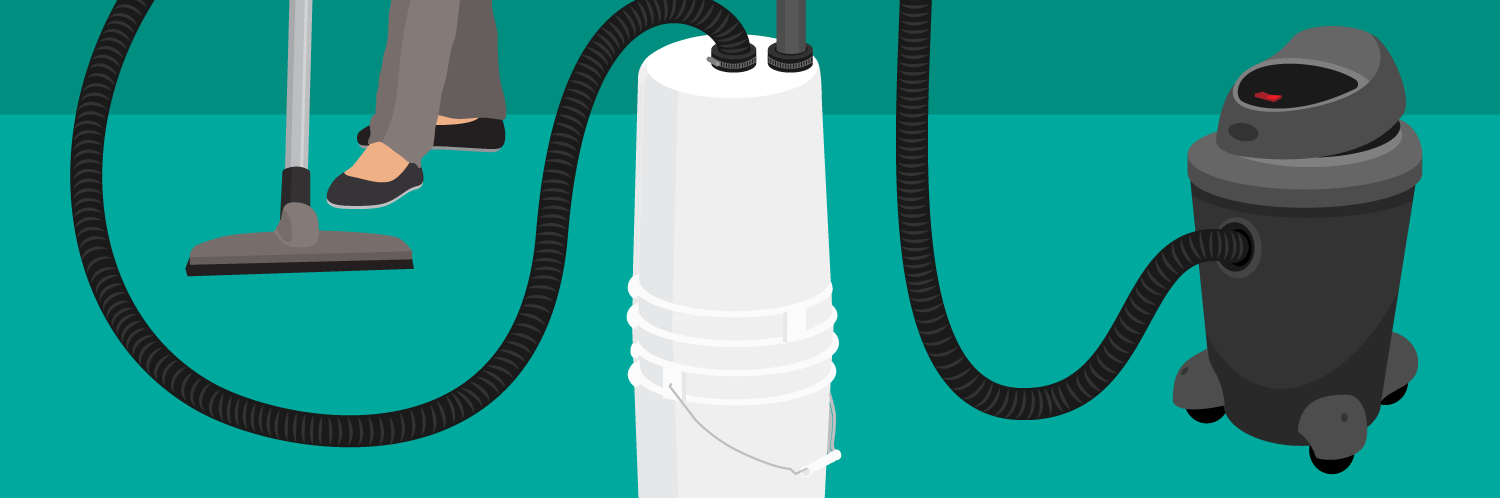
Most people use a vacuum of some sort to clean up any DIY messes, and most, if not all vacuums have a filter. But those filters get absolutely filthy and super hard to clean, which is why our solution is here to fix that problem! That solution? A homemade dust collector!

What is a Dust Collector?

A dust collector is a vacuum-style device used to specifically clean dusty messes, and separate them from your main vacuum chamber and filter, to reduce the overall mess created and cleanup required. After you're done vacuuming your mess, it can be easily disposed of, and with our DIY collector, can carry a larger capacity than the average shop vac!

What Materials Do I Need?

Most of these materials are fairly inexpensive, but are all equally crucial to the overall operation of your dust collector!

  • Vacuum (preferably a shop-vac)
  • 2 large buckets
  • 3 1.5"/38mm couplers
  • 90-degree 1.5" fitting
  • 45-degree fitting
  • 3 short 1.5" pipes with 1.375" length
  • 2 2" flexible pipe caps
  • 1 small sheet metal screw

First Steps

  1. Cut the handle off of one of your buckets.
  2. Using a jigsaw or dremel, remove the first ring around the top of the bucket, along with the two ridges on each side.
  3. With a fresh blade utility knife in-hand, remove the burr from the lid of the bucket, on both sides. It helps to hold the knife at a 90-degree angle on the outside edge.
  4. Go around the edge of the bucket a few times, and you'll find it gets easier and smoother each time.
  5. With the modified bucket, place it on top of the untouched bucket and push it down to create a seal between the two. If the top bucket doesn't go down easily, it likely needs to be burred further.

Once both buckets are sealed together, you can begin to create the spiral system that will pool your dust at the bottom.

Now the Next Pail

  1. Separate the buckets again, and with the modified bucket you'll notice the underneath of the bucket has slight bumps and waves.
  2. Measure 1/2-inch from the edge of the bucket on one of the lower points, and with one of your 1.5" pipes and draw its measurements on the bucket.
  3. Do this again for the center of the bucket, with a scribe or similar tool.
  4. Drill starter holes within each hole drawn, and use a stepper drill if you have one. Then finish the holes by cutting the measurements from earlier.
  5. Take the two pipes and 2 of the couplers and push them together, creating a resistance seal.
  6. Now, push the pipes into the cut holes.
  7. From the inside of the bucket, attach the last coupling to the middle pipe and hit it with a hammer to seal it.

This dust collector will use a spiral technique that keeps the flow of dust constant and clean, for easier disposal.

Almost There!

  1. Now with the 90- and 45-degree fitting, you'll want to create a U-shape with them, and then twist them until there's a small spiral created in their shape.
  2. Fit the other side of the 90-degree fitting onto the untouched pipe within your bucket, and push the assembly again the side of the bucket so the dust spirals in.
  3. Screw the sheet-metal screw right where the previously attached fitting comes out within your bucket.
  4. Attach the two flexible rubber end-caps and secure them to the pipes with the metal clamp by tightening it with a screwdriver.
  5. Take the hose from your vacuum, and draw its measurement against the 2 flexible rubber end-caps.
  6. Make a hole with a drill and dremel the hole until it's a tight seal with the rubber hose.
  7. Now you can attach the hose from your vacuum to the middle-hole, and the other rubber hose attached as the hose you suck the dust up with.

With both hoses now attached, the dust collector is finished and you are ready to begin cleaning your workshop!

That's it!

And that is all there is to it! Now you can vacuum the dust in your workshop, home, or wherever you need - without having to be concerned about any large amounts of dust getting into your main vacuum filter! And if you're in need of any vacuum parts, make sure to check out our large selection of OEM vacuum parts!

Embed the article on your site

Build Your Own Cheap & Easy DIY Dust Collector!
  • Post
  • Pin It
  • Subscribe

Written by:

The content team at Fix.com is made up of a group of experts who bring passion, years of experience, and unique perspectives together to create high quality, helpful and entertaining content that is accessible to all who need it. With the guidance of our expert repair technicians, our team of technical writers and designers are proud to create a place where you can find invaluable information about everything in and around your home from simple appliance maintenance tips to exciting DIY projects and everything in between.
Content Team's Author Profile
Topics   Woodworking
Get Organized by Building This Simple, Low-Cost DIY Storage Unit

Is your garage or basement in need of a storage solution? Read our step-by-...

Home Improvement Projects You Can Do with Reclaimed Wood

Repurpose and upcycle your reclaimed wood with these easy home improvement ...

Table Saw Techniques

Creating seamless, beautiful wood joints is made fast and easy with the app...