The dryer thermal fuse, also sometimes referred to as the thermal cut off or temperature fuse, is a 2 by 1/2-inch, white, plastic safety mechanism that halts the flow of electricity to the motor circu...
This kit includes two door strikes, and three door catches, to service doors that have one or two catches. The strike is mounted on the body of the dryer, while the catch is mounted on the dryer door....
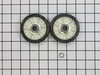
This is a rear drum support roller kit for your dryer. The 2 rollers come with 4 tri-rings, and 1 palnut. We recommend that you replace both rollers at once. This kit stabilizes the drum cylinder, whi...
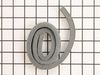
The idler pulley is found in your dryer and provides tension to the belt in order to rotate the drum. If your clothes are taking a long time to dry, the machine is noisy while operating, or the dryer ...
This small but mighty OEM piece is called a tri-ring and is used to support the drum roller shaft and the idler pulley shaft in your dryer. It helps to provide a tight seal between components by evenl...
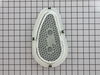
This lint filter and cover assembly is a genuine OEM replacement part for your dryer. The filter is used to prevent lint and debris from entering the dryer vents. If the filter has become damaged or i...
This heating element connection wire kit is a genuine OEM replacement for your electric dryer. The kit is used to connect the thermostat to the heater element. The kit comes with a yellow wire nut and...
The push-to-start switch is a genuine OEM part for your dryer. When the button is pressed and released, it activates the dry cycle for your laundry. If your dryer will not start or it shuts off too so...
This is a multi-use screw and can be used on a variety of appliances. The measurements of the screw are: 8/18 x 3/8. *Please note: the screw is sold individually. Refer to the manual provided by the m...
This genuine OEM part is a lint trap housing seal for your dryer. This part is used to form an airtight seal at the back of the dryer drum and the lint duct. The foam seal is approximately 28 inches i...
This 18 ml bottle of white appliance touch-up paint is used to cover scratches or marks on your appliance. The white touch-up paint can be used on refrigerators, microwaves, ranges, clothes dryers, an...
This is a multi-use cover screw. It fits appliances such as dryers, ranges, washers, dishwashers, refrigerators, air conditioners, washer dryer combos, freezers, wall ovens, microwaves, dehumidifiers,...
In Stock
Questions and Answers
Ask our experts a question about this part and we'll get back to you as soon as possible!
2 questions answered by our experts.
< Prev
1
Next >
Sort by:
Search filter:
Clear Filter
Your search term must have 3 or more characters.
Keep searches simple. Use keywords, e.g. "leaking", "pump", "broken" or "fit".
Sorry, we couldn't find any existing answers that matched. Try using some different or simpler keywords, or submit your new question by using the "Ask a Question" button above!
Matt
June 15, 2022
I’m getting a lot of lint on my clothes at the end of a wash cycle, how do i fix this?
For model number WET4024HW0
Hi Matt,
Thank you for your question. To prevent your clothes from getting lint on them, make sure to sort the clothes based on colors and fabrics and do not overfill the washer. If you are already doing this and you are still getting lint on your clothes, the water pump filter may clogged. If it is clogged, then you will have excess lint your clothes after the water has drained. You will need to clean the pump filter. If you have any questions, please let us know. We are open 7 days a week. We look forward to hearing from you!
I need to replace my dryer timer (the blue plastic piece broke off while trying to turn the knob) and I can not figure out how to remove the front panel to access it. Does it just pop off? Are there screws holding it on? Please help!
For model number WET4024HW0
Hello Shelly, thank you for contacting us. Firstly, remove the plate under the front panel by unscrewing the screws on it. Then you will be able to remove the front panel and access the timer. The panel is not screwed, try pulling it down to disassemble it. We hope this helps.
1 person found this helpful.
Was this helpful?
Thank you for voting!
✖
Ask a Question
Ask our experts a question on this part and we'll respond as soon as we can.
First I unplugged the dryer, then removed the back panel, this exposed most all of the wiring and I could see the heater coils. Not knowing what the problem was I started looking at the coils and could not see any broken parts. So then checked the thermal fuse for continuity I removed the two wires from it with a small pair of
... Read moreneedle nose pliers, it was held in place by two screws, once they were removed the fuse came out easily, I checked continuity with a volt meter placing the meter on X1 Ohms and could not get a reading. I replaced with a new one and put it all back together the way I took it apart. Then I plugged it in and it worked first time, I now have warm dry clothes.
Read less
2966 of 3341 peoplefound this instruction helpful.
Cleaning the lint out of the whole machine took quite a bit of time--it was everywhere. Underneath the lint trap was a collection that ultimately ruined the thermal fuse where it restricted the air flow considerably.
Ascertaining the problem was the most time consuming part.
The actual repair was quite simple and did
... Read moren't take but 15-20 minutes.
Received your parts, Popped them both right into place, Even though only one side needed to be replaced, I wanted them to match up. It was amazing how easy this was. My husband was quite impressed I had ordered these rather then look for either a new or used dryer from some other source.


 Diagram and Parts List for Whirlpool Washer Dryer Combo")