


Models
>
79090133700
79090133700 Kenmore Range
Jump to:
Find Part by Name
Keep searches simple, eg. "belt" or "pump".
Manuals & Guides for 79090133700
Click to downloadKeep searches simple, eg. "belt" or "pump".

$11.77
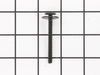
This genuine OEM mounting screw is used to bolt the door handle to your range. The screw measures approximately 2 inches long and is sold individually. If your oven door handle has come loose or falle...
In Stock

In Stock

$39.39
This element has looped terminal ends and comes with a black medallion center. This element is a genuine OEM replacement part, has looped terminal ends, comes with a black medallion center, and fits m...
In Stock

$47.34
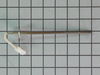
If your oven has little to no heat, is not heating evenly, or is reaching too high a temperature, there may be a problem with your oven probe. This probe, also known as an oven temperature sensor or a...
In Stock

$11.79
This is an 8-inch drip bowl for your range or cooktop. It is made of porcelain and is black in color. Place the drip pan under your burner to catch food that may drip or spill while you cook. It is 10...
In Stock

$10.92
This is a light bulb lens, and it is made for your oven. This part protects the light bulb inside your oven by covering it. The lens is made of glass, and has a 3-inch diameter. Before making this rep...
In Stock

$10.21
This drip bowl is a genuine OEM replacement part for your stovetop. It is black in color, made of porcelain, and six inches in diameter. To replace the drip pan, you simply need to remove the burner e...
In Stock

In Stock

In Stock

In Stock

$7.71
Sold Individually. These legs should be adjusted to make your appliance level on uneven flooring.
In Stock

In Stock
Questions and Answers
We're sorry, but our Q&A experts are temporarily unavailable.
Please check back later if you still haven't found the answer you need.
Common Problems and Symptoms for 79090133700
Viewing 9 of 9Oven is too hot
Fixed by these parts
How to fix it
Little to no heat when baking
Fixed by these parts
How to fix it
Element will not heat
Fixed by these parts

How to fix it
Oven not heating evenly
Fixed by these parts
How to fix it
Door won’t close
Fixed by these parts


How to fix it
Will Not Start
Fixed by these parts

How to fix it
Door won’t open after self cleaning cycle
Fixed by these parts

How to fix it
Gas igniter glows, but will not light
Fixed by these parts
How to fix it
Touchpad does not respond
Fixed by these parts

How to fix it


Keep searches simple. Use keywords, e.g. "leaking", "pump", "broken" or "fit".
- Customer:
- Mitch from Fernandina Beach, FL
- Parts Used:
- 5304503232
- Difficulty Level:
- Easy
- Total Repair Time:
- 15 - 30 mins
- Tools:
- Screw drivers
Cracked oven door inner glass
Repair was quite easy, as long as you have the instructions for removing the door. The screws that hold the bottom of the door to the fixed hinge are placed into the side of the hinge assembly after removal; this holds the door at a 45 degree angle for easy removal. After that, just place the door on a flat surface and dismantle the door
... Read more
from the inside. The inner glass is contained in a metal frame with another piece of glass; this frame comes apart easily using the clips in each side. The door assembles easily after the glass is replaced; just take your time and give yourself enough room to lay out the parts as you go. Good luck!
Read less
Was this instruction helpful to you?
Thank you for voting!
- Customer:
- Richard from Centennial, CO
- Parts Used:
- 5304528973
- Difficulty Level:
- Really Easy
- Total Repair Time:
- Less than 15 mins
- Tools:
- Nutdriver
Oven wouldn't operated. Error code F9
I called a repair place. They charged $54 to diagnose, (said it needed a new latch motor) then wanted $220 to complete the repair. I checked online prices and did it myself for about 15 minutes work and the latch motor itself ($44?).
Was necessary to uplug the range, pull it away from the wall and remove the back panel sheet m ... Read more etal, then 3 screws that mount the motor. Replace motor, reattach sheet metal. Plug in. Done. Ready to bake cookies.
Was necessary to uplug the range, pull it away from the wall and remove the back panel sheet m ... Read more etal, then 3 screws that mount the motor. Replace motor, reattach sheet metal. Plug in. Done. Ready to bake cookies.
Read less
Was this instruction helpful to you?
Thank you for voting!
- Customer:
- Tim from ASHAWAY, RI
- Parts Used:
- 316490000
- Difficulty Level:
- Really Easy
- Total Repair Time:
- 15 - 30 mins
- Tools:
- Socket set
oven did not heat up
Replaced the probe because that's what this site recommended.The oven still does not heat up.
Was this instruction helpful to you?
Thank you for voting!