


Models
>
66515879000
66515879000 Kenmore Dishwasher
Jump to:
Find Part by Name
Keep searches simple, eg. "belt" or "pump".
Manuals & Guides for 66515879000
Click to downloadKeep searches simple, eg. "belt" or "pump".

$7.72
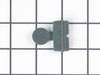
This is a single rack track stop clip used to prevent the upper dish rack from sliding all the way out of the dishwasher. It is made of gray plastic and can wear with time. This is an easy repair that...
In Stock

$29.44
If the top rack of your dishwasher is no long sliding in and out smoothly, you may need to replace one of the wheels. This genuine OEM parts assembly includes the wheel, the mount, the axel, and the c...
In Stock

$10.06
The mounting bracket is used to secure the top part of your dishwasher to the underside of your counter or cabinet. If you have solid surface counters (granite, quartz, etc.) you will likely need to s...
In Stock

$63.91
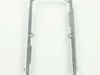
This is a genuine OEM replacement silverware basket for your dishwasher. The basket measures approximately 19.5 inches long, 4 inches wide, and 9 inches high. It is made of gray-colored plastic and in...
In Stock

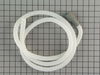
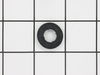
This black rubber gasket is a genuine OEM replacement part for your dishwasher door. The gasket helps to provide a tight seal between the door and the tub, preventing water from leaking while the appl...
In Stock

$7.51
The friction sleeve, sometimes called a friction pad, is made of a flexible black plastic and measures a bit over one inch in length. It is designed to reduce the friction between the hinge and the do...
In Stock

$35.51
When replacing these fuses the wire harness must be replaced as well. It is located in the control panel. The harness is included with this part now.
In Stock

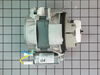
This part releases the detergent and rinse aid into the dishwasher.
In Stock

$68.34
This water inlet valve should be located behind the lower kickplate panel in either the right or left corner. The attaching solenoid on the valve will open and close according to the desired amount of water needed.
In Stock

In Stock

In Stock

$13.70
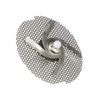
This part is the top spinner located at the very top of the wash tub. Water passes through all the spinners causing it to dispense all around the tub.
In Stock
Questions and Answers
We're sorry, but our Q&A experts are temporarily unavailable.
Please check back later if you still haven't found the answer you need.
Common Problems and Symptoms for 66515879000
Viewing 10 of 10Not cleaning dishes properly
Fixed by these parts


How to fix it
Leaking
Fixed by these parts


How to fix it
Will Not Start
Fixed by these parts


How to fix it
Noisy
Fixed by these parts

How to fix it
Door latch failure
Fixed by these parts


How to fix it
Not draining
Fixed by these parts

How to fix it
Will not dispense detergent
Fixed by these parts
How to fix it
Not drying dishes properly
Fixed by these parts

How to fix it
Will not fill with water
Fixed by these parts

How to fix it
Door won’t close
Fixed by these parts


How to fix it


Keep searches simple. Use keywords, e.g. "leaking", "pump", "broken" or "fit".
- Customer:
- Steve from Inver Grove Heights, MN
- Parts Used:
- WPW10757217
- Difficulty Level:
- A Bit Difficult
- Total Repair Time:
- More than 2 hours
- Tools:
- Nutdriver, Pliers, Screw drivers, Wrench (Adjustable)
Loud grinding noise from water pump
Rather than remove the pump assembly - as an earlier post had done - I pulled the entire dishwasher out and laid it down on the floor. This allowed easy, direct access to the motor (that was the hard, messy part). From this point it was easy. Unplug the wiring, remove the retaining bolt, rotate the motor off the mounting brackets and pull
... Read more
it out. Then put the new one in. That was the easy part (about 15 minutes). The entire job took 2-and-a-half hours, most of which was taken in disconnecting, cleaning up and reconnecting the dishwasher. It's much quieter now.
Read less
Was this instruction helpful to you?
Thank you for voting!
- Customer:
- Ed from Fanwood, NJ
- Parts Used:
- WP8558129
- Difficulty Level:
- Easy
- Total Repair Time:
- 30 - 60 mins
- Tools:
- Nutdriver
dispenser door was not closing
1. Remove torx screws around outer edge of inside of door.
2. Separate outer door panel from inner door panel.
3. Locate dispenser, and remove 6 hex nuts and 2 wires for solenoid.
4. Insert new dispenser and re-insert hex nuts.
5. Reinsert torx screws.
2. Separate outer door panel from inner door panel.
3. Locate dispenser, and remove 6 hex nuts and 2 wires for solenoid.
4. Insert new dispenser and re-insert hex nuts.
5. Reinsert torx screws.
Was this instruction helpful to you?
Thank you for voting!
- Customer:
- Michael from St. Louis, MO
- Parts Used:
- WPW10757217
- Difficulty Level:
- A Bit Difficult
- Total Repair Time:
- More than 2 hours
- Tools:
- Nutdriver, Pliers, Screw drivers
Dishwasher motor - making a very loud grinding noise
I went on the internet and found a pdf file with the Kitchenaid dishwasher repair manual for my model. One of the hardest parts of the job was convincing myself that I could do the job. When you're young, you just go out and buy a new dishwasher and tell yourself, "it's only money, we'll make more." When you're over 50, you tell yourse
... Read more
lf, "I can fix this. It will mean I get to retire a week sooner if I don't spend another $700 for a new dishwasher."
In hindsight, I could have done this job (replace the motor) in about 30 minutes. 1) Turn off electrical breaker in basement. 2) slide out dishwasher. 3) disconnect water supply. 4) use old towels to soak up any water still in the tub. 5) turn dishwasher on it's side. 6) unhook the wire harness plug from the motor, squeeze with fingers to unhook. 7) unbolt motor, 1 bolt. 8) turn motor counterclockwise, 1/4 turn. 9) pull motor out from sump, requires some force. 10) install new motor, but use some rinse aid to lubricate the rubber seal on it. Instead I did things the hard way and took the whole darn machine apart!!! See my story below.
I was surprised at how simple the design was and how few parts there really were inside the dishwasher. I found the pdf repair manual very useful, and I also found some repair videos on line. One thing they may or may not tell you - clean the parts well and lubricate the gaskets with some 'rinse aid' liquid when you put the machine back together. Also, it might help you to take a few pictures with a digital camera before you take things apart - that might help you remember how things go back together. Take close up pictures and use a treble light to illuminate the area when you're taking a picture.
The new motor was the ticket to fixing the loud noise. I was worried because the part cost $150. Before I ordered a new motor, I hooked up the old motor to electricity on my work bench and was able to recreate the really loud noise - so I was pretty sure that the new motor would eliminate the problem. It was very easy to install the new motor, only one bolt holds it in place. I did need to disassemble several parts to get to it though. Have no fear. One thing I did was mark the electric leads that went to the small pump with red and black sharpie markers so I could easily see which terminals to plug them back onto.
After reassembling the whole dishwasher with a new motor and testing the dishwasher for leaks by pouring a couple pitchers of water into it - I put the beast back under the counter (hooking it back up to the water supply line, the drain pipe to the garbage disposal and finally the electric supply). Then I ran it and water gushed out the bottom.
This whole job should have been easy, but things never go easy for me. Maybe if I would have lubricated the old sump gasket with rinse aid it would have sealed properly when I reinstalled it. Maybe if I would have cleaned the old sump gasket and the bottom of the tub really thoroughly things would have sealed right. But I didn't - so it leaked. I went ahead and bought a new sump gasket ($30 and had a few more days of waiting and self-doubt and having the dishwasher broken down). One the gasket came, I went through the entire uninstall, disassembly, reassembly and reinstall process AGAIN!!! This time with the new clean sump gasket and thoroughly cleaned surfaces. I also lubricated the gasket with rinse aid before installation. NO LEAKS! Job finished. Lessons learned. Doing it the first time was pretty tough though. Good luck! Get a helper for moral support and picture taking!
Read less
Was this instruction helpful to you?
Thank you for voting!